1. Create Database
Create a new database for example abc_database . You can create it using phpMyAdmin, SQLyog, or similar applications.
Then create a table
users with columns like the picture below and fill with login data.
Important !! for password is using md5 algorithm, so make sure your password has been converted in md5 format.
In addition to the above steps, the process of creating tables can use the import sql that has been included in the download file. in this file, I have input some data for login process:
username: admin, password: admin;
username: member, password: member;
2. Create Application
Login Page (index.php) created using template you can get at
https://startbootstrap.com/template-overviews/coming-soon/
<!DOCTYPE html>
<html lang="en">
  <head>
    <meta charset="utf-8">
    <meta name="viewport" content="width=device-width, initial-scale=1, shrink-to-fit=no">
    <meta name="description" content="">
    <meta name="author" content="">

    <title>ABC Corp</title>
 <link rel="icon" type="image/png" href="img/favicon.ico"/>
    <!-- Bootstrap core CSS -->
    <link href="vendor/bootstrap/css/bootstrap.min.css" rel="stylesheet">

    <!-- Custom fonts for this template -->
    <link href="https://fonts.googleapis.com/css?family=Source+Sans+Pro:200,200i,300,300i,400,400i,600,600i,700,700i,900,900i" rel="stylesheet">
    <link href="https://fonts.googleapis.com/css?family=Merriweather:300,300i,400,400i,700,700i,900,900i" rel="stylesheet">
    <link href="vendor/font-awesome/css/font-awesome.min.css" rel="stylesheet">

    <!-- Custom styles for this template -->
    <link href="css/coming-soon.min.css" rel="stylesheet">
  </head>
  <body>
    <div class="overlay"></div>
    <div class="masthead">
      <div class="masthead-bg"></div>
      <div class="container h-100">
        <div class="row h-100">
          <div class="col-12 my-auto">
            <div class="masthead-content text-white py-5 py-md-0">
              <h1 class="mb-3"><i class="fa fa-adn"></i> ABC Corp</h1>
  <form method='post' action="login-process.php">
  <div class="input-group input-group-newsletter" style="padding:10px 0;">
  <input type="text" name="username" class="form-control" placeholder="Username" aria-label="Username" aria-describedby="basic-addon" required autofocus>
  </div>
  <div class="input-group input-group-newsletter" style="padding:10px 0;">
  <input type="password" name="password" class="form-control" placeholder="Password" aria-label="Username" aria-describedby="basic-addon" required autofocus>
  </div>
  <div class="input-group input-group-newsletter" style="padding:10px 0;">
  <button class="btn btn-secondary" type="submit" name="login">Login</button>
  </div>
  </form>
            </div>
          </div>
        </div>
      </div>
    </div>
    <div class="social-icons">
      <ul class="list-unstyled text-center mb-0">
        <li class="list-unstyled-item">
          <a href="#">
            <i class="fa fa-twitter"></i>
          </a>
        </li>
        <li class="list-unstyled-item">
          <a href="#">
            <i class="fa fa-facebook"></i>
          </a>
        </li>
        <li class="list-unstyled-item">
          <a href="#">
            <i class="fa fa-instagram"></i>
          </a>
        </li>
      </ul>
    </div>
    <!-- Bootstrap core JavaScript -->
    <script src="vendor/jquery/jquery.min.js"></script>
    <script src="vendor/bootstrap/js/bootstrap.bundle.min.js"></script>
    <!-- Plugin JavaScript -->
    <script src="vendor/vide/jquery.vide.min.js"></script>
    <!-- Custom scripts for this template -->
    <script src="js/coming-soon.min.js"></script>
  </body>
</html>
 Login Check (login-process.php)
This file used to continue the process after the login button is pressed. username and password data that has been entered in the login page will be checked on the database. If data is valid it will be directed to the main page (main_pages folder). when the data is invalid then the process will be redirected back to the login page.
<?php
session_start();
// db config -------------------------------------------------
$servername = "localhost";
$username = "root";
$password = "";
$dbname = "abc_database";

// Create connection
$conn = new mysqli($servername, $username, $password, $dbname);
// Check connection
if ($conn->connect_error) {
    die("Connection failed: " . $conn->connect_error);
}
//----------------------------------------------------------
if ( isset($_POST['login'])){
    $username = $_POST['username'];
 $password = md5( $_POST['password']);

    $sql_query = "SELECT name, email, username, id FROM users
                  WHERE username='$username' AND password='$password'
                  LIMIT 1"; //sql query
    $result = $conn->query($sql_query);
    if ($result->num_rows > 0) {
    // data valid
       while($row = $result->fetch_assoc()) {
        //retrieve data from database and stored in session;
        $_SESSION['name']= $row["name"];
 $conn->close();
 header('location:main_pages/index.php');//dirrect to main page folder
 exit();
 }
     } else { //data invalid
 //alert then back to login page
 echo "<script language=\"javascript\">alert(\"Invalid username or password\");
 document.location.href='index.php?error_login';</script>";
 exit();
     }
} else {
    header('location:index.php');
    exit();
}
?>
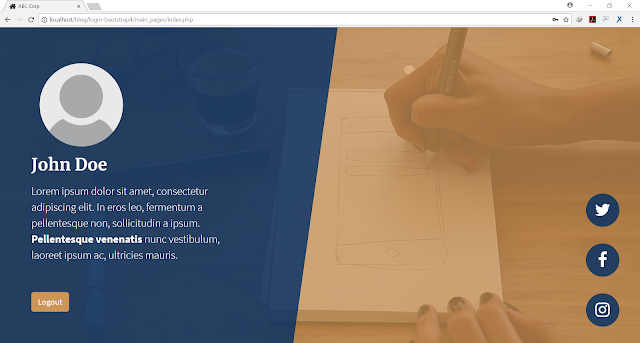
Main Page (index.php)
This file is the main page that can be accessed when the login is successful. This file is located inside a different folder (in the example: main_pages folder).
<?php
session_start();
if ( !isset($_SESSION['name'])){// handling if dont'have session

 header('location:../index.php');
 exit();
}
$name = $_SESSION['name'];
?>
<!DOCTYPE html>
<html lang="en">
  <head>
    <meta charset="utf-8">
    <meta name="viewport" content="width=device-width, initial-scale=1, shrink-to-fit=no">
    <meta name="description" content="">
    <meta name="author" content="">
    <title>ABC Corp</title>
 <link rel="icon" type="image/png" href="../img/favicon.ico"/>
    <!-- Bootstrap core CSS -->
    <link href="../vendor/bootstrap/css/bootstrap.min.css" rel="stylesheet">
    <!-- Custom fonts for this template -->
    <link href="https://fonts.googleapis.com/css?family=Source+Sans+Pro:200,200i,300,300i,400,400i,600,600i,700,700i,900,900i" rel="stylesheet">
    <link href="https://fonts.googleapis.com/css?family=Merriweather:300,300i,400,400i,700,700i,900,900i" rel="stylesheet">
    <link href="../vendor/font-awesome/css/font-awesome.min.css" rel="stylesheet">
    <!-- Custom styles for this template -->
    <link href="../css/coming-soon.min.css" rel="stylesheet">
  </head>
  <body>
    <div class="overlay"></div>
    <div class="masthead">
      <div class="masthead-bg"></div>
      <div class="container h-100">
        <div class="row h-100">
          <div class="col-12 my-auto">
            <div class="masthead-content text-white py-5 py-md-0">
              <img src="../img/profile-icon.png" class="rounded-circle" width="240px" height="240px" style="padding:20px;">
  <h2 class="mb-3"><?php echo $name; ?></h2>
  <p class="mb-5">Lorem ipsum dolor sit amet, consectetur adipiscing elit.
  In eros leo, fermentum a pellentesque non, sollicitudin a ipsum.
  <strong>Pellentesque venenatis </strong> nunc vestibulum, laoreet ipsum ac, ultricies mauris.</p>
  <div class="input-group input-group-newsletter" style="padding:10px 0;">
  <a href="logout.php" class="btn btn-secondary">Logout</a>
  </div>
            </div>
          </div>
        </div>
      </div>
    </div>

    <div class="social-icons">
      <ul class="list-unstyled text-center mb-0">
        <li class="list-unstyled-item">
          <a href="#">
            <i class="fa fa-twitter"></i>
          </a>
        </li>
        <li class="list-unstyled-item">
          <a href="#">
            <i class="fa fa-facebook"></i>
          </a>
        </li>
        <li class="list-unstyled-item">
          <a href="#">
            <i class="fa fa-instagram"></i>
          </a>
        </li>
      </ul>
    </div>

    <!-- Bootstrap core JavaScript -->
    <script src="../vendor/jquery/jquery.min.js"></script>
    <script src="../vendor/bootstrap/js/bootstrap.bundle.min.js"></script>

    <!-- Plugin JavaScript -->
    <script src="../vendor/vide/jquery.vide.min.js"></script>

    <!-- Custom scripts for this template -->
    <script src="../js/coming-soon.min.js"></script>

  </body>

</html>

Logout Process (logout.php)
When logout button is pressed, the process will be directed to this file. Function of this file is to delete a session that has been successfully logged. After that the process will be directed to the login page.
<?php
session_start();
session_destroy();
header('location:../index.php');//goto login page
?>
Okay.., That's all for the tutorial create Login form with Bootstrap 4 , for a more complete code (and file) can be downloaded at the download link. hope you like it and Enjoy Coding .


